|
| Configure Oracle Dataguard |
| Tuesday, November 28, 2006 |

|
We have moved to http://onlineAppsDBA.com kindly check http://onlineAppsDBA.comin future
Yesterday we looked at Data Guard overview in Oracle Database http://becomeappsdba.blogspot.com/2006/11/oracle-dataguard-for-business.html , Today I am going to cover step by step configuration for Oracle Dataguard & may be in next or future posts I will discuss on common mistakes which you can do while configure dataguard / standby database.
Below steps are based on assumptions that Primary Database is on Machine1.domain.com & Standby database is on Machine2.domain.com . Database Instance Name is PROD and database listener is listening on port 1525. Mount point on primary & standby database are same (If they are not you need to set parameter db_file_convert)
Assumptions
I am assuming using LGWR, ASYNC option with log shipping service which means ,
LGWR (Log Writer process will be used to write to standby site instead of ARC archiver process)
ASYNC (Redo logs to standby is asynchronous to primary site)
You may have to change options with log shipping service (LOG_ARCHIVE_DEST_n) depending on data protection mode you wish to choose. (I am using Maximum Performance Mode - Default Mode)
Enable Archive log
For standby database configuration your primary database should be running in achieve log mode. In order to convert your primary database into archive log mode follow these steps
SQL> SHUTDOWN
SQL> STARTUP MOUNT
SQL> ALTER DATABASE ARCHIVELOG;
SQL> ALTER DATABASE OPEN;
SQL> alter system set LOG_ARCHIVE_DEST_1 ='LOCATION=/u01/oracle/data/arch' scope=spfile; (I am assuming that you are using spfile here , if you are using pfile skip scope=spfile)
SQL> alter system set LOG_ARCHIVE_DEST_2 ='SERVICE=PROD_remote1.domain.com LGWR ASYNC REOPEN=60' scope=spfile; (We will create above TNS Alias in next step)
SQL> alter system log_archive_dest_2='DEFER' (Defer this until you have standby system Up)
SQL> shutdown immediate
SQL> startup
You should see archive logs generated after this on standby site
Enable Force Logging
You should enable Force logging in primary database else if some transaction which doesn't generate redo log can corrupt your standby database. (Careful in OLTP transactions or long running requests in Apps)
SQL> ALTER DATABASE FORCE LOGGING;
Set Initialization Parameter
SQL> alter system set fal_client = ÂPROD.domainname.com scope=both;
SQL> alter system set fal_server = ÂPROD_remote1.domainname scope=both;
(Here FAL, Fetch Archive Log is used to fetch archives in case gap in archives arises because of any reason)
SQL> alter system set STANDBY_FILE_MANAGEMENT=AUTO scope=both; (This is used to automatically generate file in standby site like if you add a datafile, this will create one in standby site as well)
Create Standby Control file & copy datafile including oracle_home
Create standby control file as
SQL> alter DATABASE CREATE STANDBY CONTROLFILE AS '/u01/oracle/home/standby.ctl'
You can installed New Database on standby site or Use ORACLE_HOME software from primary site on standby site.
Copy datafiles, redologs, initializations file, tnsnames.ora, listener.ora & control file from primary site to standby site.
Other steps & few important things w.r.t. dataguard coming in Next Post...Labels: 11i, advanced |
We have moved to kindly check onLineAppsDBA.com in future
|
|
|
 del.icio.us
¦ del.icio.us
¦
 Digg This
¦ Digg This
¦
 My Yahoo
¦ My Yahoo
¦
 Reddit
¦ Reddit
¦
 BlinkList
¦ BlinkList
¦
 Furl It
¦ Furl It
¦
 Email This
¦
Leave Your Comments
Email This
¦
Leave Your Comments
|
posted by Atul Kumar @ 8:18 PM
  |
|
|
|
| Oracle AS Cluster ( Identity Management )-> Active - Active |
| Saturday, November 18, 2006 |
|
|
We have moved to http://onlineAppsDBA.com kindly check http://onlineAppsDBA.comin future
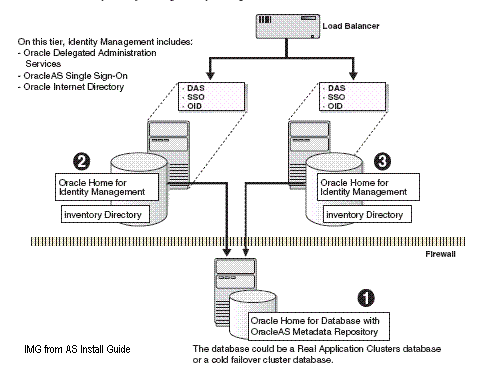
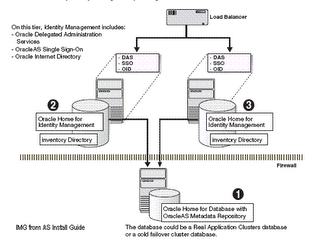 Identity Management is Infrastructure component of Application server in Fusion Middleware Family. Identity Management is Infrastructure component of Application server in Fusion Middleware Family.
Oracle's Identity Management Components include -
SSO - Oracle Single Sign-On Server
OID - Oracle Internet Directory
DAS - Delegated Administrative Services
DIP - Directory Integration & Provisioning Services
OCA - Oracle Certifying authority (Optional)
I am going to cover them in detail in my future posts, These Services & Component are quite important for Apps DBA as IM (Identity Management) is part of Oracle Apps Release 12.
This post covers overview & important notes w.r.t. to Identity Management Cluster where IM component are in Active Active scenario, which means IM components (OID, SSO, DAS) are available on both nodes for High Availability .
For IM underlying database can be single Instance database or Two or Multiple Instance RAC (Preferably atleast Two Node)
Distributed / Non Distributed IM
Distributed IM means IM components (SSO, DAS, OID) are distributed on more than one machine (SSO & DAS on one machine & OID on second machine).
Non Distributed IM means all IM components are on same machine.
You can cluster both Distributed or Non Distributed Identity Management
Here are few Notes/Checks which I learnt from my various Implementations
Things you should know before starting Installation
- Check if you want Distributed or Non-distributed IM Cluster
- Virtual Name of HTTP Server (Infra for SSO & OIDDAS) and protocol (http or https)
- Virtual Name of OID including port (SSL & NON-SSL, you need both. Default is 389 & 636 resp)
- Communication protocol requirement (HTTP or HTTPS) between
CLIENT -> Load Balancer -> HTTP Server
things you must do before Installing Oracle AS Identity Management Cluster
- synchronize system clock on all server (which are part of cluster) with in 250 second
- set cookie persistence at load balancer specifically for URI /oiddas/ , If your browser doesn't support persistence setting at URI level then set for all HTTP Traffic (Set cookie to expire when browser session expires)
- Before Installing firt OID Node make sure TCP monitoring is not enabled on Load Balancer on first node
- Configure load balancer to return immediately to calling clients
Things/Tips which will be handy for AS Cluster (IM Type)
- For first OID Node Installation, make sure MR is not registered with any OID else it will fail. Installer checks that & if it finds that MR is already registered it assumes first node & asks for first OID node information to make it part of OID cluster
- Choose similar component on other node of cluster (i.e. If node first Node you have OID & DAS then on other Cluster node also Install OID & DAS)
- To access OID on any OID node in cluster , you have to use Password for ias_admin on first installation and not ias_admin password used second , third or further installation of Instance in cluster (oiddas, orasso, oidmon)
- For IM Cluster you always select IM and not IM+MR (This is during Installation Screen)
- For IM content database should already be loaded with Metadata Repository using Repca or MRCA (Repository Creation Assistance or Metadata Repository Creation Assistance)
- Installation steps for first OID Node is different than subsequent Node
- For IM Cluster , never select IM+MR during Installation screen , always select IM only.
- You have to select HA (High Availability) during Installation Options.
More on Indentity Management Cluster Installation..
Enable Apex Applications for SSO authentication ..
Coming soon ....
Now register for E-mail notification via "Email Subsciption" on your right Menu BarLabels: 10gAS, advanced, oid |
We have moved to kindly check onLineAppsDBA.com in future
|
|
|
|
del.icio.us
¦
Digg This
¦
My Yahoo
¦
Reddit
¦
BlinkList
¦
Furl It
¦
Email This
¦
Leave Your Comments
|
| posted by Atul Kumar @ 7:30 PM
|
|
|
|
|
|